Pipeline Runner
The MDI apps framework itself carries one app called the Pipeline Runner. It provides an interactive GUI you can use to configure, execute, and monitor job files for Stage 1 Pipelines. Thus, Pipeline Runner is an app that runs pipelines.
Availability
Pipeline Runner is only supported on Linux servers, typically when running the MDI in remote mode, i.e., when the app is running on a local computer and the web server is running on your HPC server. Remote configurations make it easy to control your HPC server from a web page and to load pipeline data packages for interactive visualization. Your permissions within the app are determined by the server username you use to log in via SSH.
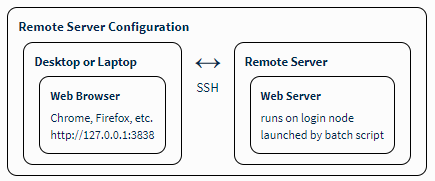
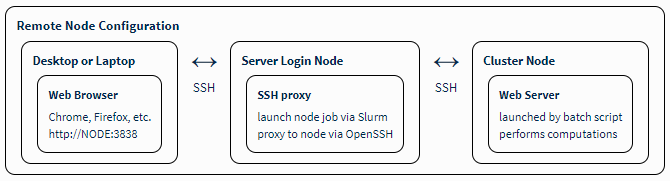
Less commonly, some administrators might wish to enable the Pipeline Runner on a public server, an advanced usage that requires careful consideration of server security.
Enabling the Pipeline Runner app
You control whether Pipeline Runner is offered to users from the launch page by changing config file stage2-apps.yml:
# config/stage2-apps.yml
pipeline_runner: auto
job_default: demo1
where valid values for pipeline_runner are:
- auto = enable Pipeline Runner in remote modes only (the default)
- true = enable Pipeline Runner whenever possible, even on public servers
- false = disable the Pipeline Runner, even in remote access modes
Use the job_default key to specify the named file path that is used as the default when the user searches for job files on the server. Only paths defined in stage2-apps.yml will be available to users. See:
Create and edit job configuration files
The first tab of the Pipeline Runner app, Configure Options, allows you to assemble named sets of related job configuration files that can be saved in a bookmark.
The interface is designed to be intuitive. In general, the steps are to:
- select a tool Suite and Pipeline
- click Create New to save a new job configuration file
- click on the job file to edit in the Job Configuration Files table
- (de)select the pipeline actions you wish to execute
- use the tabs to edit the options for each required action
- click Save Job Config to save your changes
When editing options, be sure to notice:
- the * icon, which indicated required options
- the ? icon, which provides a desription of each option
- the folder icon, which allows you to interactively select server file paths
Modify existing job configuration files
A key feature of the job configuration interface is that you can easily create a new job file with small modifications from an existing file, as follows:
- load the job file that will act as the template for the new file
- edit the required options as above
- click Save As…* to save the changes into a new job file, which will then be part of the job file set
This method makes it easy to quickly analyze a new incoming data set the same way as a prior data set.
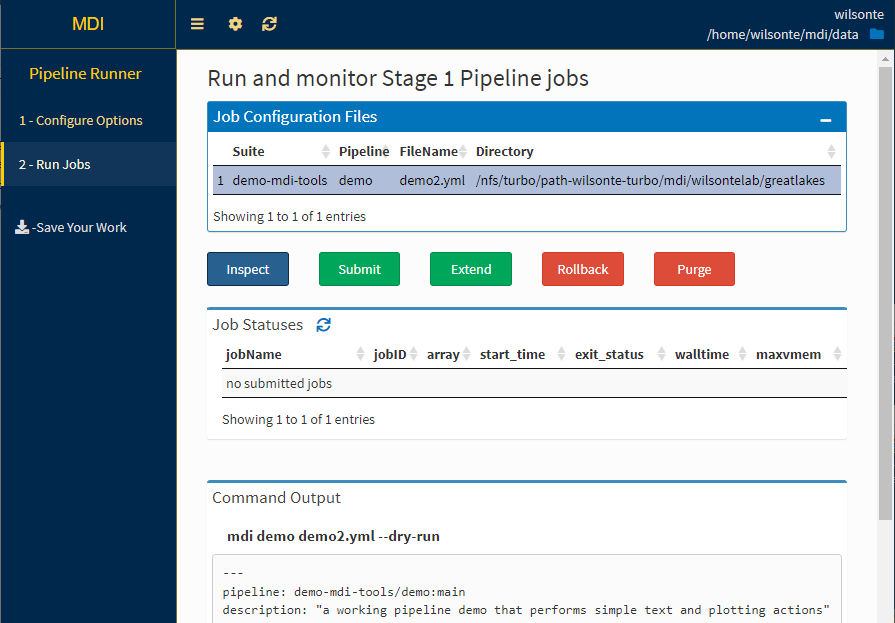
Execute and monitor jobs
When you are happy with your job file definition(s), use the Run Jobs tab to interact with the server’s MDI installation and job scheduler. The buttons offered by this app step are wrappers around the corresponding subcommands of the mdi command line interface.
The general steps to execute and monitor pipeline jobs are:
- click the file you wish to execute or monitor from the Job Configuration Files table
- click Inspect to check whether your job file is valid and review the actions it will take
- click Submit, and then Execute Submit to queue the job
- monitor the Job Statuses table to see the job state and progress, clicking the refresh icon periodically
- click on a job in the table to see its log file report, both while the job is running and after it completes
- click Download Package to download the pipeline’s data package to your local computer when the job is done
If there is a problem, the feedback text at the bottom of the page will be shown in red - you will need to correct the reported errors and try again.